 Loading... Please wait...
Currency Displayed in
Currency Converter


Select Videos List
- • What Videos Should I Get? A Buyer's Guide
- • Shop Our Latest Video Releases
- • Shop All Single Instructional Digital Downloads
- • Shop All Digital Download Sets
- • Shop All Single Instructional DVDs
- • Shop All Discounted DVD Sets
- • Shop Soaring Basics Programs - Digital & DVD
- • Shop Thermal Soaring Training - Digital & DVD
- • Shop Electric Glider/F5J - Digital & DVD
- • Shop All DLG & F3K Training - Digital & DVD
- • Shop Glider Building - Digital & DVD
- • Shop Documentary Film Downloads
- • Shop Entertainment Film DVDs
Parkzone E-Flight Radian Modification and Tuning Guide
Posted by Paul Naton on 29th Jan 2016
Use the coupon code new10off at check out to save 10% off any Radio Carbon Art training DVD, digital download or video set.
Horizon Hobby Parkzone E-Flight Radian Modification and Improvement Guide
By Paul Naton © 2015 Feel free to share this site location or content
http://www.radiocarbonart.com/
The Radian (and the Pro version, which is not the best trainer choice) is a fine plane, and I recommend this glider to all new pilots learning to fly. Get one, fly it hard for a year, learn to tune it right, learn to thermal, learn to land it at your feet almost every time in calm or wind. When you can do all that, and fly this glider confidently in any conditions, it's then time to step up to a better performing plane.
The particular Radian shown in the photos and videos is being used as a demo e-glider for a training video program (Electric Sailplane Clinic 1) I produced covering electric soaring essential skills. This plane is also used as a primary trainer for my 10 year old son who is getting good with the baby UMX Radian.
Out of the box, the Radian is flyable for sure, but it certainly does not handle as well as it should, nor glide as efficiently as it could. Compared to balsa-built gliders like the Gentle Lady, Spirit, or Wanderer, all of which I have built and trained others on, the Radian needs some help reaching its true soaring potential. Some of the included gear, its installation, rigging and flight settings are not what they could be for easy learning and instructional gliding. With a few mods and improvements, it can as good as or better than any 2 meter woody trainer.
Yes, the following mods can be applied to the Pro version as well.
I first flew a friend's stock Radian before getting mine, and it was clear right away that it was way out of tune, hard to control in pitch at any speed, and would not hold trim. I felt like a big foam dog, but I could tell it had more soaring potential.
Like with any new glider, I ran the stock Radian through some basic set-up and tuning procedures learned over 25 years of hard-core slope and thermal competition flying with the world's best pilots. I've built over a 100 gliders of all kinds so doing tuning and optimization is second nature.
I first check all the plane's hardware looking for flaws. I disassemble things to check build quality, then remount things, improve what's there, then tune the CG and program the radio to get a 95% perfect glider before the first flight. All of the set up and building techniques I use are taught on in my video series like the Performance Tuning training video.
The things I did to improve my Radian are not magical, difficult to do or high tech. The only money spent was on paint and a bigger Graupner prop. My main goal was to optimize the planes performance under power and while gliding. I also wanted to improve reliability, eliminating any break-points or failure-prone hardware. I also wanted to make the plane a bit more crash worthy as it will be flown by kids at some point.
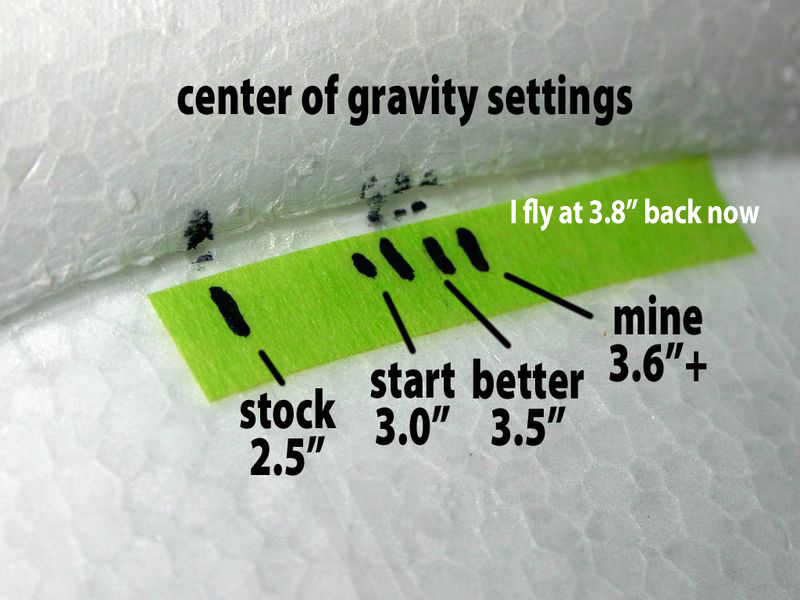
First off, the Center of Gravity setting recommended in the manual was going to be way off, and this is a typical problem with most ARF gliders. Just looking at the nice modern planform of the Radian's wing, I guessed the CG was about an inch or more too far forward. Since I couldn't move the gear in the fuse back much, and tail weight was going to be required, I decided to add more structure to the tail group and stiffen up the floppy foam fuselage and bendy elevator fin.
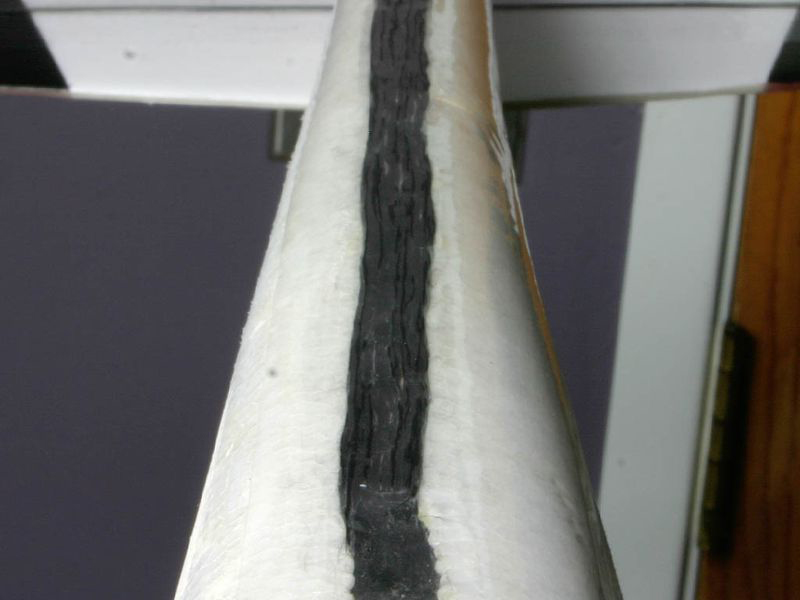
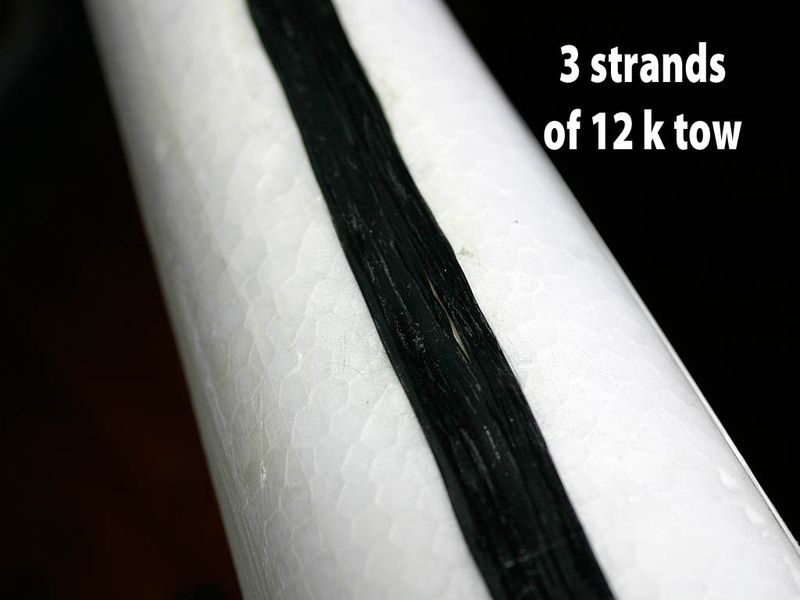
I first laminated 3 strands of 12K carbon tow down the boom with epoxy, see pictures. Used a slow set epoxy and made a nice dry layup, this added maybe 6 grams overall, and this really helped stiffen the boom. A 1/8" hollow carbon rod or arrow shaft inserted and epoxied into the foam at the bottom of the fuselage from the wing saddle to the tail is even a better way to stiffen things up.
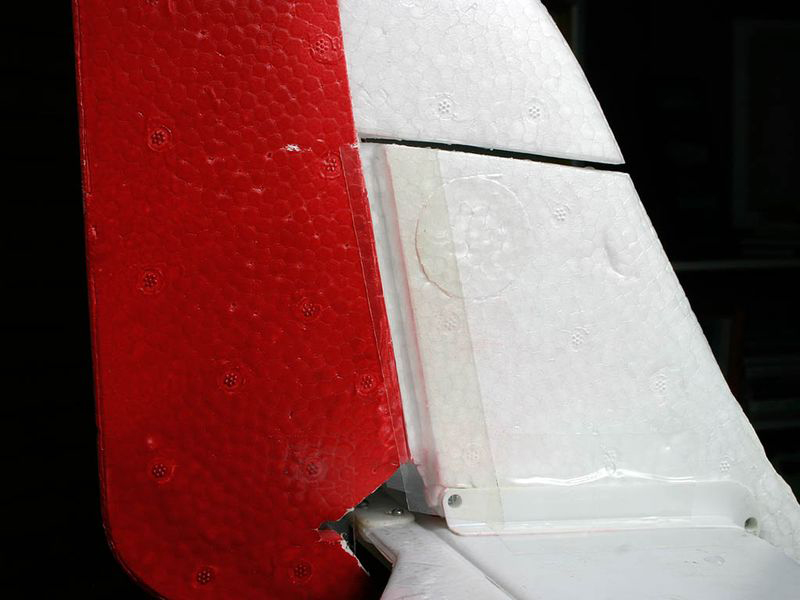
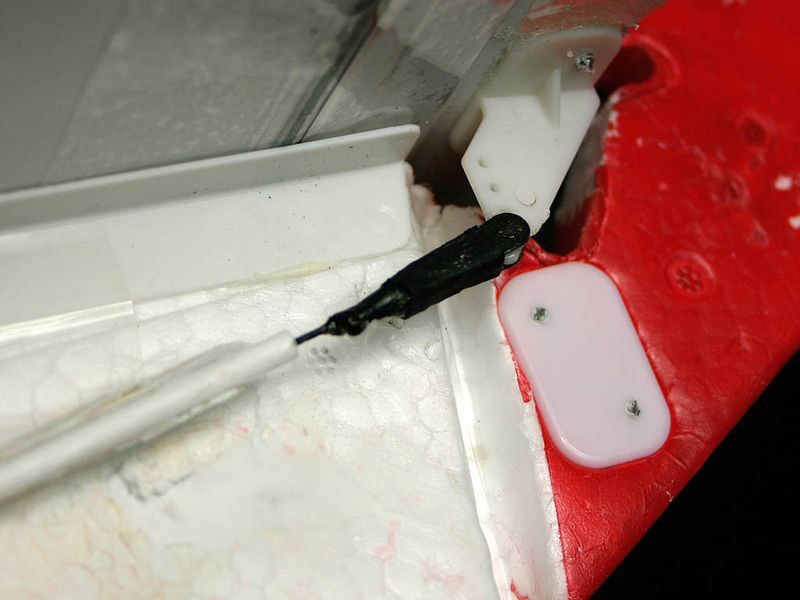
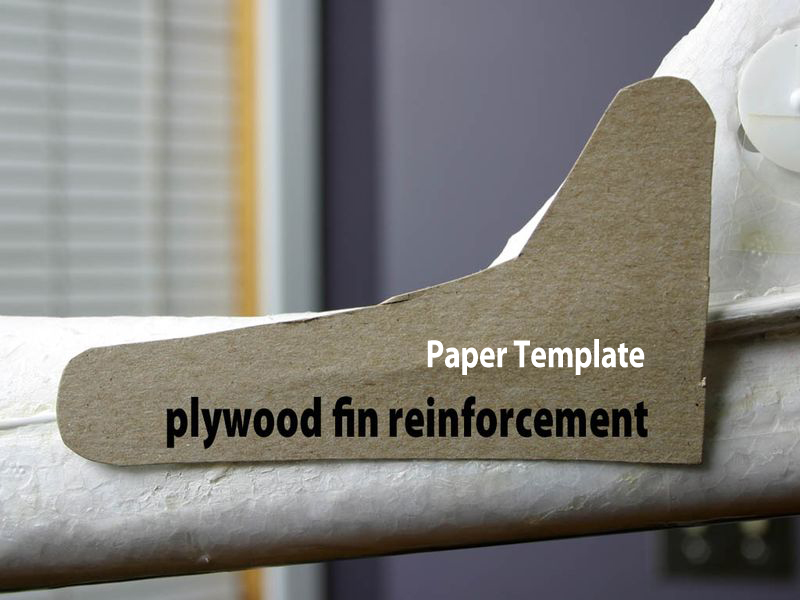
There is a weak point at the juncture of the vertical fin and fuselage, there's not much foam there. There's lots of twisting force there from the rudder as you turn. Nothing worse than aeroelasticity in the elevator/fin area when going at a fast L/D (lift over drag) speed. I made a plywood splint, slotted out the fin with a knife, and epoxied it in place. See picture for the approximate shape. This splint ties in vertical fin to the fuselage and keeps the whole structure from bending. The splint make a big improvement in handling with minimal bending and twist even under G loads. The elevator stays firm, no pitch or yaw drift when maneuvering.
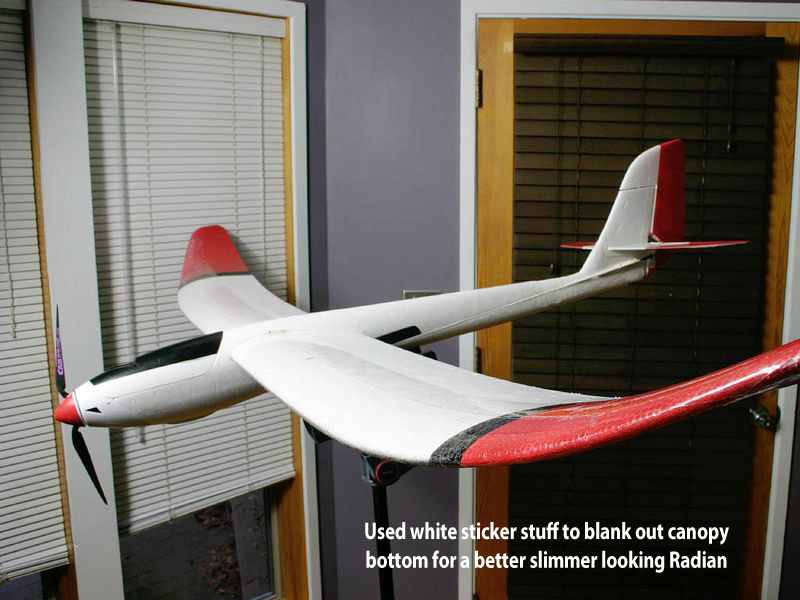
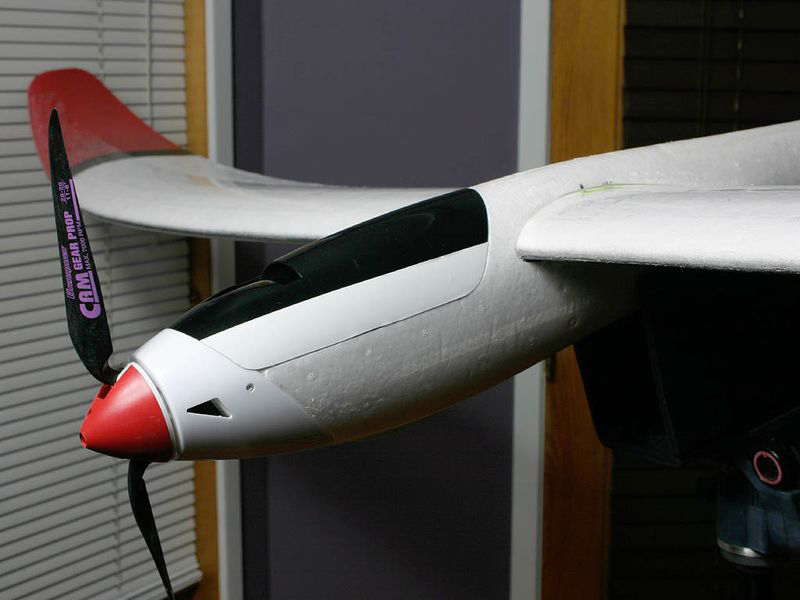
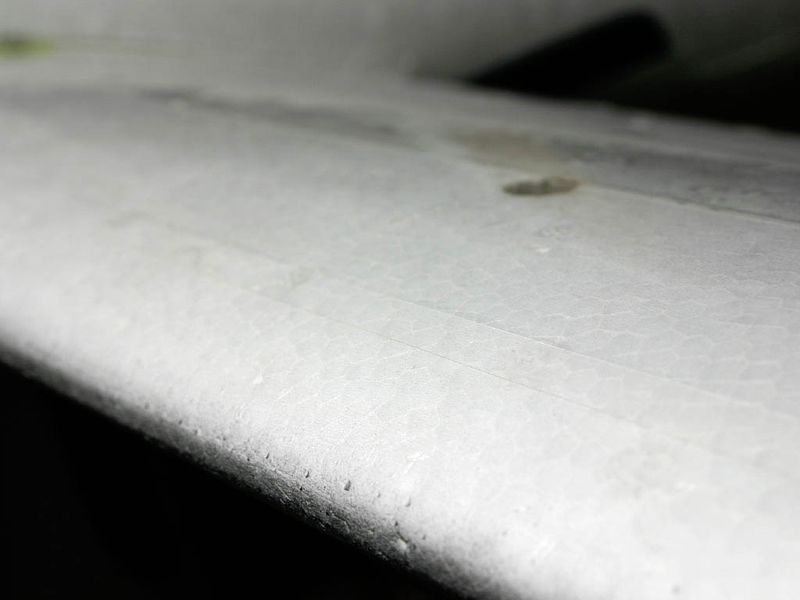
For the wings, I wet sanded the foam with 400 grit to get off the nubs and polished up the LE a bit. Added 3M box tape around the leading edge span-wise and added 2 strips top and bottom. The tape smoothes out the foams roughness and adds much strength span wise without adding much weight. Having the smooth tape for the first half of the wing should really help keep the flow more laminar. Three grams added weight per tape strip, well worth it for stiffer cleaner wings. Tape also adds crush resistance for the whole leading edge area. Low temp film would work too, though much heavier. Paint on tips is Krylon Fusion for red, cheap black enamel for the rest. Tape peels paint though, so tape first, paint over. Pro Tip: Use alcohol to clean the foam of mold release before adding tape, painting, or gluing.
The stock plastic hinges of the elevator are going to fail, so I cut thru the plastic hinges, then used box tape to hinge the surface back together. Tape gives more stiffness too, so added a strip top and bottom span wise. The rudder hinges seem OK for now, I added some gap seal to the top hinge area, this should help rudder response a bit. Will keep tabs on that rudder hinge line though, I suspect it will wear quickly and fail. Standard CA flex hinges would be a good replacement for the rudder.
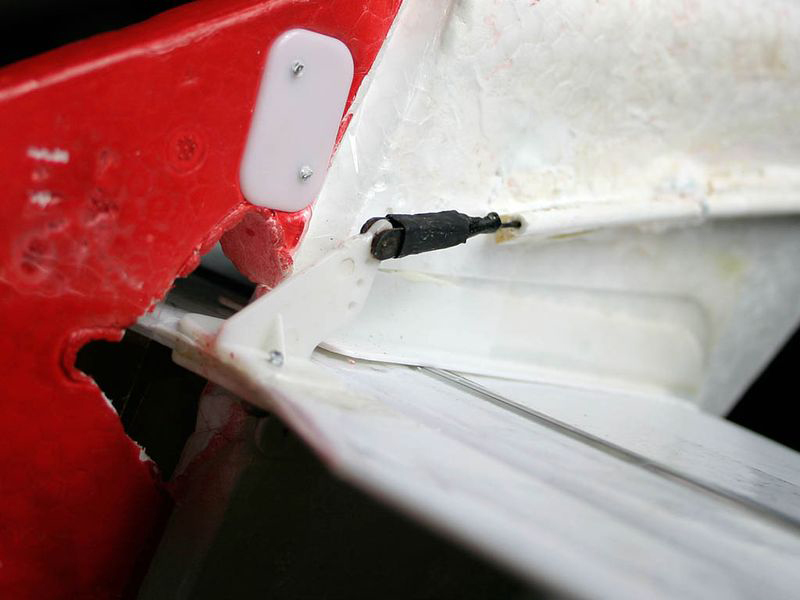
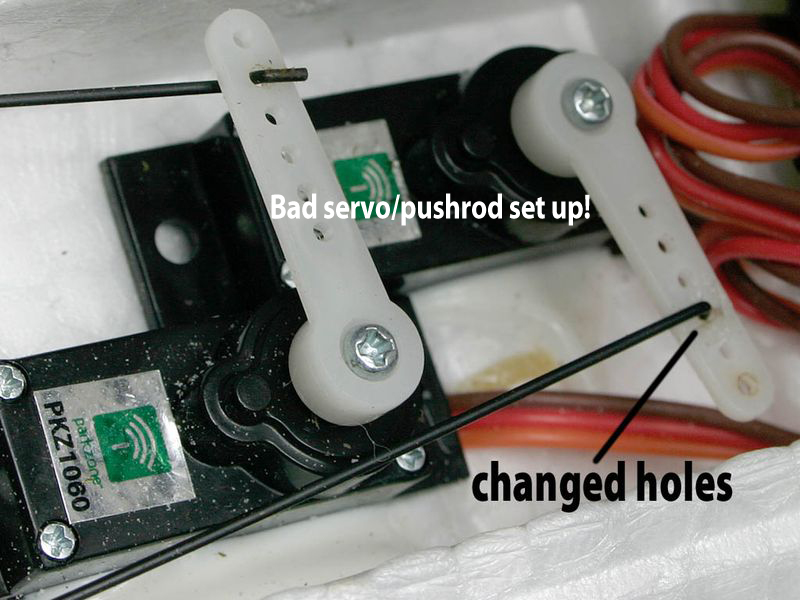
Pushrods/servos: The geometry of the pushrods is not the best. Having huge arms on the servos and using the far outside holes is not good glider practice as it reduces the resolution and holding power of the low-cost analog servos. This poor pushrod set up at the servos causes double centering, poor servo power response at higher speeds, and reduced resolution. I haven't remounted/replaced the servos yet, but might later. I did move the elevator pushrod to the next hole in, though I would like it in further. I melted the servo arm slightly with a soldering iron at the hole to close it up to remove slop at the pushrod z bend. You can use CA at the hole too. having a tight elevator pushrod system is critical in achieving smooth pitch response and accurate elevator position trimming! A lot of the Radian pitch control complaints come from the double-centering of the elevator system.
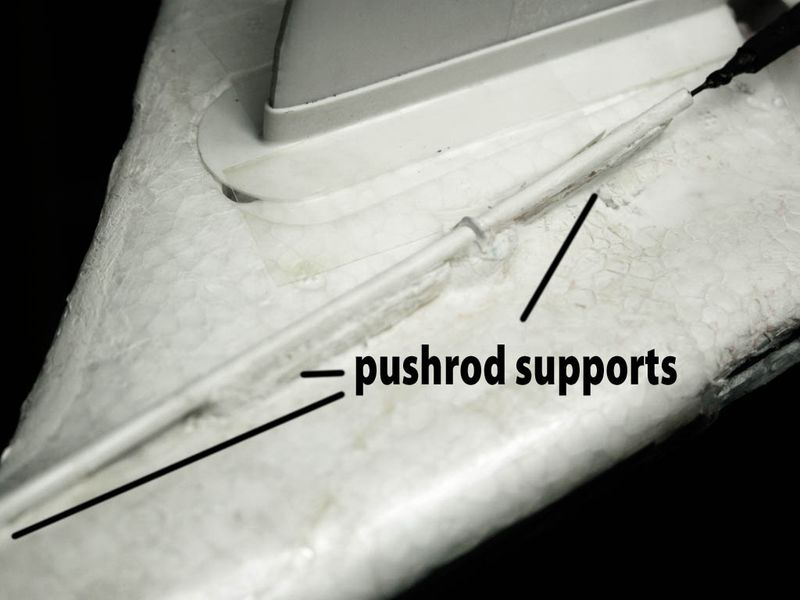
I also faired in the pushrod runs in the fuse with light weight spackle, and used balsa blocks to support the pushrods at the aft ends to eliminate flex under load. (see photos) I also glued down the entire pushrod lengths with CA as the factory glue is poorly done and does not hold well.
The clamps they use at the control surface ends ARE junk. I broke both of them tightening them down. Horizon should know better than to use parkflyer hardware on a 2 meter. (NOTE: they have replaced the hardware in newer planes as of 2015) As you can see in the pictures, I used snap links either glued/crimped or epoxied to the pushrods. Far more reliable and stiff. There are other larger hardware connectors you could also use. I moved the elevator horn more inboard to get a straighter run and smoother movement. You have to reinforce the elevator area to do this, there is not much foam to clamp into. I CA'd the two plastic horn halves together along with the screws, it's strong now. This mod really helped eliminate double neutral in the elevator system. My elevator system is rock solid and centers perfectly, even with the long arm on the cheap servos. Elevator feel/centering is critical to good gliding.
I then put the plane on the tuning table and measured for wing twist (foam twists easy) and the decalage angle (angle of incidence between wing and elevator) with Robart meters. I cover all of this vital tuning stuff in the Performance Tuning video. http://www.radiocarbonart.com/produc...ailplanes.... Wings checked out fine. Nice.
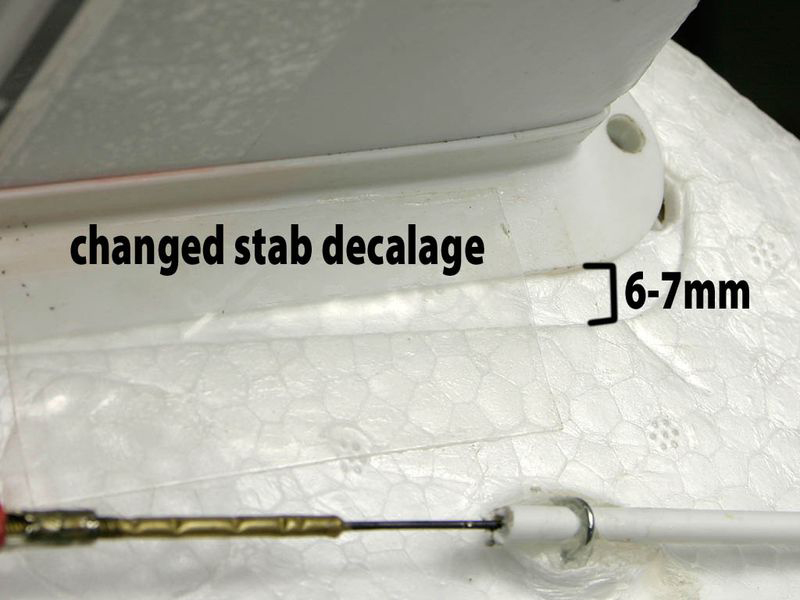
However, the decalage angle (stab to wing incidence) was about 2 degrees or more. You could see the big angle just by looking down the boom from behind. This is the main issue with the Radian, built in MASSIVE up trim. The forward factory CG location combined with the UP stab angle makes the Radian climb quickly any time the speed increases while gliding or under power.
Check out the photos, fixing the decalage is easy, describing it is not. Unscrew the plastic stab mount, its 2 pieces. re-insert the female end partially (shorter stubs) and rotate the front upwards, the measurement of the bottom of the plastic mount to the old embossed area molded into the fin should be 6-7mm, which gets rid of about 2 degrees of angle. You need to slice a piece of foam out of the top of the stab mount hole to fit the mount back in, and drill a new hole for the front screw stud. See photos. Reassemble the mounts with some CA or hot glue. You will have to trim the rudder clearance hole a bit so the horn clears at full deflections. Remount stab, cover gaps with tape. Takes about 5 minutes.
NOTE: Later Radians seem to have less decalage angle, though many still have this angle issue due to the poor factory gluing of the fuselage stiffener. The angle of the stiffener in effect sets the tail angle to the wing. If your Radian balloons even after you move the CG way back, and you already have some down-trim in the elevator, check you tail decalage angle.
I still needed some tail weight to get the CG back where I liked it, so a 1 oz lead chunk got inserted into the foam under the rear tail skid. This got my CG over an inch back from the 'factory' setting. An inch is a huge amount of CG shift even for a 4 meter plane.
Because I worked on the elevator linkage to ensure perfect centering, my Radian flies hands off, and will free fly for long periods. It is not pitch unstable, yet does not pull up at all in a dive test. The glider is sensitive to the lightest energy changes in the air, and responds crisply to any elevator stick movement. The elevator flap trims flat at a medium L/D glide, and a few clicks of up gives it a minimum sink speed.
My 2 basic elevator trim settings are set to flight modes, my JR 9503 radio has this ability. I have a third mode for speed penetration which adds more down trim to penetrate wind. With the built-in down thrust of the motor, (which is there to counter the stock forward CG and decalage pull up tendency) I needed to mix a little up up elevator with the motor switch, but just a bit, plane now climbs at a 45 angle hands off. With the stock tuning set up, you had to have the stick jammed forward to keep the plane from looping under power.
For you guys putting a 2100 mah motor pack in the nose, this shifts your CG even more forward and if you are already at the factory CG setting, you are just making the plane's trim and CG problem worse.
If you are scared to change CG, get a 1/2oz piece of lead, and tape it to the boom just in back of the wing. Slide it back a bit each flight and feel how the plane changes. Keep going back as you learn how the handling feels. As the CG comes back, you will need more down trim, try a one or two clicks at a time, you are looking for a flat glide path while gliding. CG changes will only help things so much, you need to change the decalage angle (or elevator trim setting) to get things really rocking. CG is a personal preference, but extreme nose heaviness kills handling and thermal finding ability. You may need to reduce the total elevator throw in your radio if the elevator gets too sensitive as the CG goes back. Use a dual rate with reduced throw until you get used to the more sensitive elevator response. You will be amazed how much better this trainer flies when you get the CG back and elevator trimmed properly.
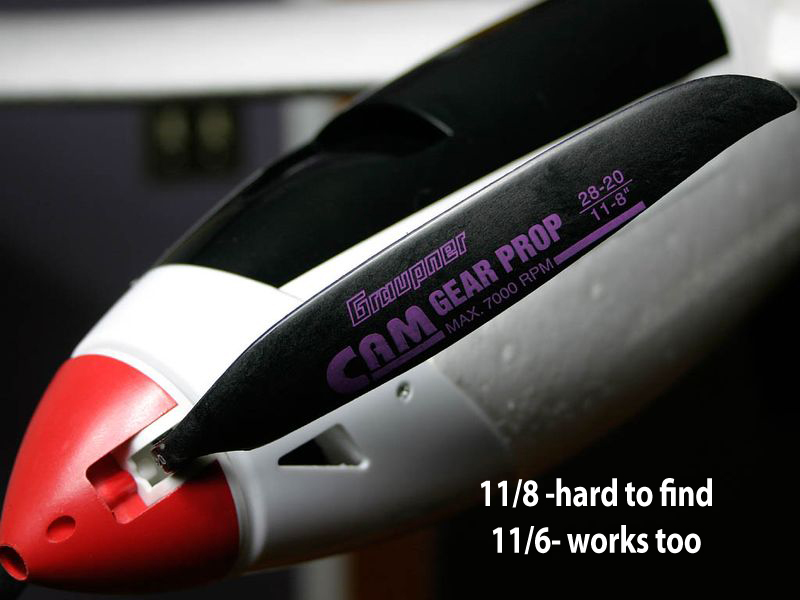
I did change the prop to a Graupner 11-8, (11-6 works too) which did improve the climb, though at the expense of run time. I still use the stock spinner as it is the lightest solution. The stock spinner has a high failure rate, I've blown up a few already. I'm going to try a Multiplex Cularis spinner next which fits the Radian perfectly and is a better design. I won't put on any of the aluminum aftermarket spinners as they are very heavy and just makes the CG forward issue worse. Keep the nose light!
My motor pack is a Gen Ace 25C 1300, great price and they have been reliable. I use a smaller Thunder Power 850 45c pack for contests or no wind days. I am impressed with the stock motor system, this they did right. With the bigger prop and a decent battery, a 200 meter ALES climb in under 30 seconds is no problem. The receiver I use is a JR 921, overkill, but that's what was in the spares box. Having a fail-safe set up with this receiver is nice though, no flyways on this baby. My all up weight is 29.4 oz.
I did add flaperons after I wrote this original modification guide. Flaperons gave me fantastic roll control, camber changing for the wing, and of course tremendous speed control when used as landing flaps. Only added about 1oz. with the two extra mini servos and wire. Took a few hours to do but this mod totally transformed the poly Radian into a much more versatile soaring machine that will outfly the Pro version any day. In fact I won the second contest day of the 2012 Polecat ALES tournament with this Radian against 70 pilots most of which were flying expensive composite gliders.
Future mods will be to put some high quality digital servos in the tail, which will eliminate the tail lead and the pushrod weight. Battery should be under the wing where the servos are. Could cut weight by 2-3 oz and have better servo control as a bonus.
If you're interested in learning the basic skills of building, tuning, and flying gliders, I suggest purchasing some of my world famous training videos. Use the coupon code new10off at check out to save 10% off any Radio Carbon Art training video product.
Always happy to answer questions, contact me though the website.


Recent Posts
- » DVD Sales Ending 12-30-2023
- » WATCH FREE: Vixen 2 F5J Glider Build, Set Up, And Flying Video Series
- » Watch FREE R/C Soaring Documentaries Best of Scale Soaring & Just Want To Fly
- » New Radian Tune-Up & Servo Fix/Relocation How-To Video
- » Black Friday Deals Nov 23 to 26th: 20% Off ALL Downloads & DVDs